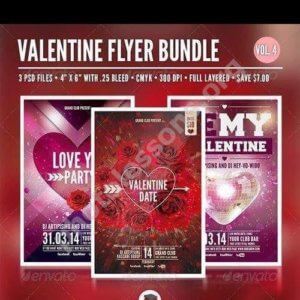
Valentine's Day Flyer PSD Template — 3 Layouts, 1275x1875 px, 70 MB Free Download

A beautiful Valentine's Day flyer design in PSD format — a ready-to-use solution for anyone who needs to quickly create a party poster, a promotional flier for a cafe or restaurant, a greeting card, or a social media banner. The archive includes three complete layouts at 1275x1875 pixel resolution, totaling 70.61 MB, fully editable in Adobe Photoshop.

If you want to spend minimal time on design while getting professional results — download the archive using the link at the end of this article. All layers are labeled, colors can be changed in a couple of clicks, and text is editable with standard Photoshop tools.

Valentine
Valentine

What's inside the archive: overview of the three layouts

The archive contains three independent PSD files. These are not variations of the same design with rearranged elements — you are getting three distinct conceptual approaches to a Valentine's Day flyer. Each layout has its own composition, color palette, and text block arrangement.

The first layout uses a classic red-and-pink palette with a large heart image at the center of the composition. Text blocks are arranged vertically — headline at the top, date and venue at the bottom. This approach works well for A3 posters and event banners.

The second layout features a darker background with contrasting typography. The composition is shifted to the left, leaving space on the right for a photo or additional decorative elements. An ideal choice for restaurants and clubs with evening programs.

The third layout is the lightest and most airy — pastel tones, thin lines, a minimalist approach. Perfect for intimate gatherings, wine tastings, and cozy lounge-style events.

All three layouts come in a single ZIP archive. Archive size: 70.61 MB. Format: PSD (Adobe Photoshop Document). Each file resolution: 1275x1875 pixels.

Technical specifications

ParameterValue
FormatPSD (Adobe Photoshop Document)
Resolution1275 x 1875 px
Color modeRGB / 8-bit
Number of layouts3 separate PSD files
Archive size70.61 MB
SoftwareAdobe Photoshop (CS6 and newer)
LayersUngrouped, labeled

All layers in each PSD file are neatly ungrouped and labeled. You will easily find the headline text layer, date block, decorative elements, and background layers. No flattened rasters without editing capability — every label, every shape, every line sits on its own layer.

How to edit the flyer in Photoshop: step-by-step guide

A PSD flyer is not just an image. It is a full-fledged constructor where you can change any detail. Here is a quick guide to basic editing.

Step 1: open the file

Unzip the archive into any folder on your computer. Launch Adobe Photoshop and open the desired PSD file via FileOpen or simply drag the file into the program window.

Step 2: edit the text

In the Layers panel (Window → Layers), find the Text group or individual text layers. Select the Horizontal Type Tool (press T) and click on the text you want to change. Type in your venue name, date, address, event program — any text you need.

Step 3: adjust colors

If your brand colors differ from those used in the template — no problem. Select the layer with the colored shape, then press Ctrl+U (Hue/Saturation) and adjust the sliders. Alternatively, double-click the layer icon and choose Color Overlay under Layer Styles.

Step 4: add your own photo or logo

Drag your image into the document. Position it using the Move Tool (V). Resize if necessary via Free Transform (Ctrl+T). If the photo needs to sit behind an element, simply move its layer lower in the Layers palette.

Step 5: save the result

For printing, save as TIFF or PDF via FileSave As. For web use, JPEG or PNG works fine — use FileExportExport As.

Do not save over the original PSD! Always use Save As and create a copy of the file before editing. Otherwise you will lose the original template.

Comparing the three layouts: which one to choose

CharacteristicLayout #1Layout #2Layout #3
Color paletteBright, red-pinkDark, high-contrastPastel, light
CompositionCentered (heart in the middle)Asymmetric (left-aligned)Minimalist
MoodRomantic and vibrantStrict and elegantDelicate and airy
Best forCafes, bakeries, shopping mallsRestaurants, clubs, barsLounges, wine bars, spas
Ideal print formatA3, A4A3, A4A4, A5

Your choice depends on your event format. For a loud nightclub party, pick the second layout — it reads instantly even in dim lighting. For a daytime cafe event, go with the first or third, depending on how bold you want the visual message to be.

Where to use these flyers

A Valentine's Day flyer is a versatile promotional tool. Here are a few usage scenarios:

  • Print advertising: print the flyer at a print shop and distribute it in shopping malls, at reception desks, in cafes and restaurants.
  • Social media: adapt the layout for an Instagram, Facebook, or Telegram post. The 1275x1875 pixel resolution is sufficient for a high-quality online publication.
  • Email campaigns: embed the flyer image in the body of an email newsletter — invite clients to a festive dinner or a special promotion.
  • Digital screens: use the layout for digital displays in retail spaces, reception areas, and elevator lobbies.
  • Gift certificates: replace the text with your promotion details and print as a gift certificate or discount coupon.
The 1275x1875 pixel resolution allows you to print the flyer at up to A3 size without quality loss. When printed at A4, the dot density reaches approximately 216 dpi — an excellent figure for advertising prints.

Design tips: how not to ruin the template

A ready-made template is a great foundation, but clumsy editing can turn professional design into an amateur result. Here are a few rules to follow:

  • Don't stretch text to the edges. Each layout has built-in margins and padding. If you increase the font size, make sure letters don't press against the flyer borders.
  • Don't swap fonts for decorative ones unnecessarily. The templates use readable typefaces. Replacing them with a calligraphic font can make the text illegible.
  • Watch the contrast. If you change the background to a darker color, check that light text remains visible. And vice versa.
  • Don't overcrowd the composition. If the template has space for one logo — don't add three. Simplicity beats clutter every time.
  • Check your spelling. A typo in the date or venue name on a flyer is a direct blow to your reputation.

Typography in the layouts: fonts and styles

All three layouts use system fonts and freely distributed typefaces. Text blocks follow a visual hierarchy: the headline grabs attention first, the date and venue are read second, and additional details come third. If needed, you can replace the font with your brand's corporate typeface via the Character panel in Photoshop.

Key text blocks available for editing:

  • Event headline (e.g., "Valentine's Party")
  • Date and time
  • Venue name
  • Address
  • Contact phone or website
  • Evening program (where space permits)
\u{201c}

Valentine's Day is the second-largest advertising spend holiday after New Year's in the hospitality and entertainment sector. A well-designed flyer can boost table bookings by 30-40% compared to a text-only announcement.

Compatibility with other editors

Although the native PSD format belongs to Adobe Photoshop, you can open and edit the files in other applications as well:

  • Adobe Photoshop — full support, all layers and effects (CS6, CC, 2023, 2024, 2025)
  • Adobe Illustrator — PSD import with partial layer preservation
  • GIMP — free editor, opens PSD, but not all layer effects transfer correctly
  • Affinity Photo — a solid Photoshop alternative, opens PSD with good compatibility
  • Photopea — online editor, opens PSD directly in the browser with no installation
  • CorelDRAW — PSD import is possible, but layers may merge
When opened in GIMP or CorelDRAW, some layers and effects may be lost. For full editing capability, we recommend using Adobe Photoshop or Affinity Photo.

Printing flyers: practical recommendations

Before sending the layout to a print shop, make sure:

  • Color mode is switched to CMYK (Image → Mode → CMYK Color in Photoshop)
  • File resolution is at least 200 dpi at the target print format
  • Text is at least 5 mm away from the edges (bleed allowance)
  • The file is saved in TIFF or PDF format with layers included (if the print shop requires it)
  • All fonts are rasterized or converted to outlines — to avoid issues with missing typefaces on the printer's computer

Why PSD, not JPEG or PNG

The main advantage of PSD over raster formats like JPEG and PNG is the layered structure. You get not a monolithic image but a constructor. Text is separate, background is separate, decorative elements are separate. Changing any component takes seconds, whereas in JPEG you would have to paint over the old text and type in new text — with inevitable quality loss in the background.

Additionally, PSD preserves:

  • Original quality without compression artifacts (unlike JPEG)
  • Transparency and alpha channels (unlike JPEG)
  • Vector smart objects without rasterization
  • Layer effects (shadows, glows, overlays) with adjustable parameters

Frequently Asked Questions

Which version of Photoshop do I need for these PSD files?

Version CS6 and newer is sufficient. The files do not use features specific to later Creative Cloud releases. You can edit the layouts even in a fairly old version of Photoshop. Tested on CS6, CC 2018, CC 2023, and CC 2024.

Can I use these flyers for commercial purposes?

Yes. The templates are distributed freely and may be used for both personal and commercial projects. You can print flyers to advertise your business, post them on social media, or include them in email campaigns.

Are the fonts embedded in the PSD, or do I need to install them separately?

Text layers use standard and freely distributed fonts. If a required font is not available on your system, Photoshop will suggest a replacement. For full visual consistency, we recommend installing the listed typefaces before opening the file (a font list is included in the archive).

Can I resize the flyer?

Yes, via Image → Image Size in Photoshop. Enlarging beyond the original 1275x1875 pixels may slightly reduce quality since the layout is raster-based. For large-format printing (larger than A3), we recommend rebuilding the layout in a vector editor or sourcing a 300 dpi original.

Why is the archive 70 MB — is that normal?

Yes, that is a normal size for three multi-layer PSD files at high resolution. Every layer, every effect, every shadow is data. A JPEG preview of the same image would be 1-2 MB, but you would lose editing capability. 70 MB is the price of flexibility.

What if I don't have Photoshop?

Use the free online editor Photopea.com. It opens PSD files directly in the browser, preserves layers, and allows text editing. GIMP (free) and Affinity Photo (paid but affordable compared to an Adobe subscription) are also good alternatives.

Can I print the flyer on a home printer?

Yes. At 1275x1875 pixels on an A4 sheet, you get approximately 216 dots per inch — quite decent for home or office printing. For commercial print runs, the quality is also acceptable.

How do these templates compare to free Canva templates?

Canva templates are simplified layouts with limited editing capabilities, tied to the platform. PSD files are professional tools with full pixel-level control, unlimited revisions, and the ability to integrate into any production workflow.

Will these layouts work for Instagram Stories?

The original aspect ratio of 1275x1875 (roughly 2:3) differs from the Stories format (9:16). You will need to crop the image or extend the background. This is easy to do in Photoshop by stretching the background layer to the desired size.

How long does it take to edit one layout?

Basic editing (replacing text and logo) takes 5-10 minutes. A full rebranding with color changes, font swaps, and element rearrangement takes 30 minutes to an hour, depending on your Photoshop experience.

Download

Tap to react