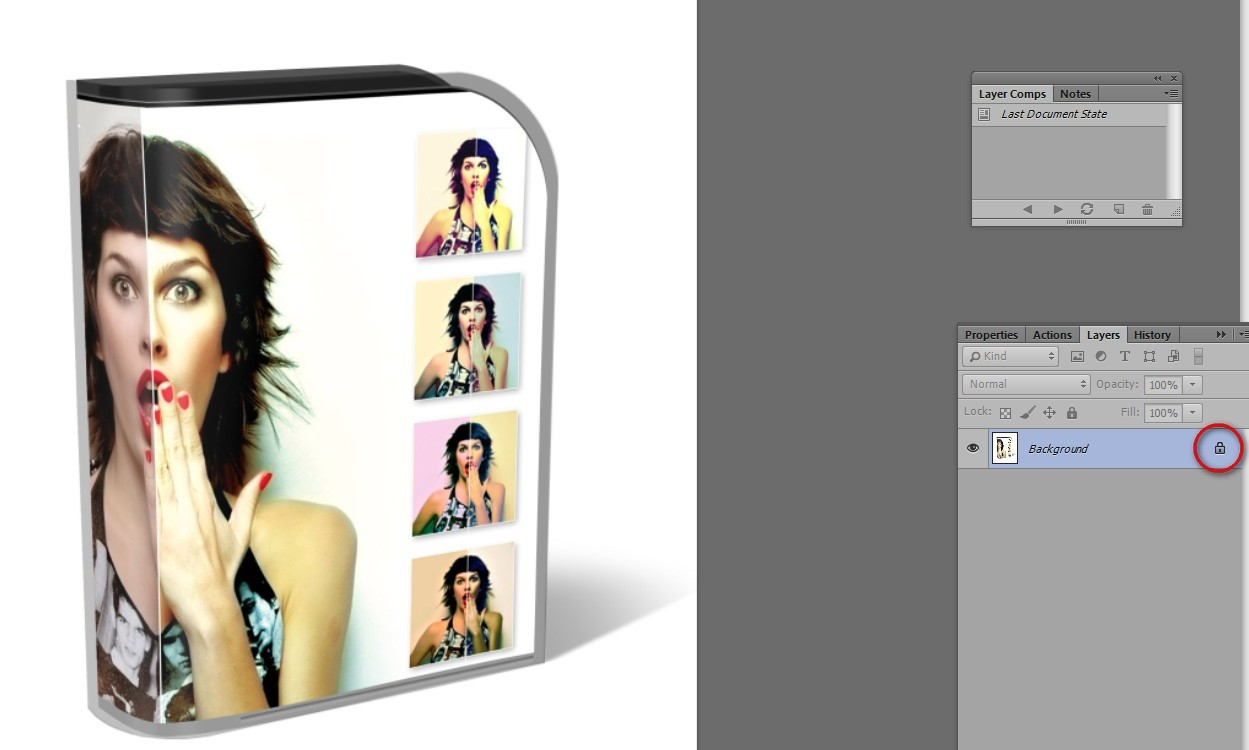
How to Unlock a Layer in Photoshop

Every Adobe Photoshop user eventually faces this situation: you open an image, try to edit it, and the program says the layer is locked. This is especially common with the Background layer, which Photoshop locks by default to prevent accidental changes. In this guide, we'll cover all methods to unlock layers in Photoshop — from the simplest double-click to advanced techniques for smart objects and problem scenarios.

How to unlock a layer in Photoshop
Layers panel in Photoshop with a locked layer

First, understand: while a layer shows a lock icon, you cannot edit it, move it, apply filters, or use layer styles. Photoshop protects the background layer from accidental modifications. This is useful when you just opened an image and don't want to spoil it. But when editing time comes — the lock must go. Let's explore all available methods to do this quickly and without data loss.

A locked layer is easy to spot by the small padlock icon next to the layer name. A gray padlock means partial lock, a black padlock means full lock. In some Photoshop versions, the lock appears as striped hatching on the layer thumbnail.

Method 1: Double-click to Unlock

This is the simplest and fastest method. Hover over the layer in the Layers panel and double-click it. If the layer was a Background layer, the New Layer dialog appears. Here you can set the layer name, color label, blending mode, and opacity. Click OK and the layer becomes a regular, editable layer — the lock icon disappears.

Unlocking a layer with double-click
New Layer dialog when unlocking a layer

Important: the Background Contents fill is selected automatically based on your current background color. If you don't want to lose the fill, leave defaults. Name the layer anything — Layer 0, Photo 1, or Base. Color labels help visually group layers: red for important, blue for backgrounds, green for finalized. This is invaluable in multi-layer projects with dozens of layers.

Method 2: Via the Layer Menu

If you prefer menu navigation, go to Layer — New — Layer from Background. This does the same as double-clicking — converts the background layer into a regular editable one.

The advantage: you can apply it to multiple layers at once. Select the desired layers with Ctrl (or Cmd on Mac) held down, then apply the command. Double-click only works on one layer at a time, so for batch unlocking, use the menu.

Method 3: Keyboard Shortcuts

For speed-oriented professionals, use keyboard shortcuts. Press Ctrl + J (Windows) or Cmd + J (Mac) to duplicate the layer. The new layer is automatically unlocked. The original background layer stays untouched — you can delete, hide, or ignore it.

More combinations: Ctrl + Shift + J cuts the selected area to a new layer. Alt + Ctrl + Shift + J (Windows) or Option + Cmd + Shift + J (Mac) creates a new layer from all contents without affecting the original. Memorize these shortcuts — they speed up work dramatically.

Photoshop keyboard shortcuts
Keyboard shortcuts for quick layer unlocking and duplication

Method 4: Removing Partial Locks

Photoshop has two lock types: full and partial. Full lock (black padlock) prevents all operations. Partial lock (gray padlock) restricts specific actions. The Layers panel has four lock buttons:

IconNameWhat it blocks
PadlockLock AllFull lock — all operations disabled
BrushLock Image PixelsCan't paint or fill, but can move
Plus with arrowsLock PositionCan't move layer, but can paint
CheckerboardLock Transparent PixelsProtects transparent pixels from fill

To remove a partial lock, simply click the button again — it unpresses and the restriction disappears. If a layer is fully locked, remove the full lock first, then each partial lock if needed. Lock buttons work as toggles: click once to enable, again to disable.

Comparison of Unlocking Methods

MethodSpeedDifficultyWhen to use
Double-clickFastLowSingle background layer
Layer menuMediumMediumMultiple layers at once
Ctrl + JFastestLowKeep original intact
Lock buttonsFastLowRemove partial locks
Context menuMediumLowUnlock a group

Why Photoshop Locks Layers

Many beginners get annoyed by the locked background layer and immediately try to unlock it. But this lock has practical value. Imagine: you opened a scanned old photo, spent an hour on color correction, levels, curves — and then accidentally dragged the background layer. All settings are broken, an hour of work wasted. The lock prevents such accidents.

Additionally, Lock Transparent Pixels is extremely useful when working with textures, frames, and graphic elements. It lets you paint only over non-transparent areas without affecting transparent edges. This saves you from creating complex selections and cleaning up mistakes. It's especially convenient for tinting black and white photos or coloring line art.

If you frequently work with PSD templates for photo books, collages, or design layouts, you've noticed some layers are partially locked. This is intentional — to prevent accidentally moving important design elements, deleting key decorative lines, or breaking the layout structure. You can remove such locks in one click, but I recommend keeping them until you finish editing.

Common Problems and Solutions

Even experienced users sometimes face situations where standard unlocking methods fail. Here are the most common issues and their fixes.

  • Layer won't unlock with double-click. First, check if Lock All is enabled on the Layers panel. If so, disable it. If not, the file might have a Read-only attribute in Windows properties. Right-click the file, uncheck Read-only, and try again.
  • Colors disappeared after unlocking. The background layer might be in Grayscale or Duotone mode. Switch to RGB via Image — Mode — RGB Color.
  • Can't apply a filter to the unlocked layer. Check bit depth: Image — Mode — 8 Bits/Channel. Some filters don't work with 16-bit or 32-bit images. Switch to 8 bits, apply the filter, then switch back if needed.
  • The Brush tool doesn't paint on the unlocked layer. The layer might be a Smart Object. Right-click the layer and choose Rasterize Layer. Painting tools will then work normally.
  • The lock icon won't disappear by any method. Restart Photoshop. If that doesn't help, reset preferences: launch Photoshop with Ctrl + Alt + Shift (Windows) or Cmd + Option + Shift (Mac) held down.
  • Layer became transparent after unlocking. You accidentally deleted the layer content. Press Ctrl + Z to undo. If that doesn't help, close the file without saving and reopen it.

Unlocking in Different Photoshop Versions

Unlocking methods have barely changed in 10 years, but there are nuances. In Photoshop CS6 and older, Layer from Background is under Layer — New, interface is light, lock buttons sit at the top of the Layers panel. In Photoshop CC, the interface darkened but logic stayed. In CC 2024 and CC 2025, a new contextual task bar appeared — just close it if it interferes.

In Photoshop Elements, the simplified home version, unlocking works differently: double-click the layer in the Layers panel and confirm conversion. Elements doesn't support advanced blending modes like Color Dodge or Linear Burn, so the New Layer dialog is simpler — no blending mode choice.

In Photoshop for iPad, layer locking exists too. Tap the layer and choose Unlock Layer from the context menu. The touch interface is different but logic is the same. Layer from Background is accessed via the plus icon at the bottom of the Layers panel. Mobile version only supports full lock, not partial types.

Layer Management Tips

Proper layer organization is the key to fast, comfortable work in Photoshop. Here are practical recommendations that will save you hours.

  • Name layers meaningfully. Background, Text, Frame, Logo, Shadow, Highlight — clear names save hours of searching. Don't leave names as Layer 1, Layer 2, Layer 3 in projects with 20+ layers.
  • Group related layers. Select multiple layers and press Ctrl + G (Windows) or Cmd + G (Mac). For example, all header elements in one group, text layers in another, decorations in a third.
  • Use color labels. Right-click a layer and pick a color. Red — urgent, yellow — in progress, green — done. This helps navigate complex layouts quickly.
  • Don't keep empty or unnecessary layers. Each extra layer increases PSD file size. Delete empty layers, hidden layers with no content, and test copies you no longer need.
  • Duplicate before complex operations. Press Ctrl + J before applying a filter, transformation, or destructive edit. If the result disappoints, you have a clean copy.
  • Use Smart Objects for filters. Right-click a layer and choose Convert to Smart Object. Then any filter remains editable and can be adjusted or removed at any time.

Technical Details of Layer Locking

Technically, layer locking in Photoshop is just a flag in the layer's data structure. When you open an image, Photoshop automatically sets this flag for the background layer because the program logic dictates: the background layer is the original image that shouldn't change. You can visually distinguish a background layer by its italic name — Background is italicized while regular layers use upright text. This is an extra hint many users overlook.

When converting a background layer to a regular one, Photoshop creates a new layer with the same pixels but without the protection flag. All pixels stay in place, colors don't change, no transparency is added — only the lock attribute changes. That's why you can safely unlock a layer without fearing data loss. The only thing that disappears is protection from accidental changes.

For advanced users: you can control locking programmatically via Photoshop scripts. Use the command app.activeDocument.layers[0].locked = false in JavaScript or ExtendScript to unlock a layer without user interaction. This is useful for batch processing large numbers of files where each needs unlocking before treatment.

Layers Panel Locking: Step by Step

Let's walk through the steps for beginners who want to fully understand layer locking. Open any image in Photoshop. On the right, you'll see the Layers panel. If it's not visible, press F7 — the standard shortcut to show it. The Background layer will be grayed out with a small padlock icon to the right of the name.

To make the layer editable, hover over it and double-click the empty space to the right of the layer name (not the thumbnail, not the name itself — the empty area). The New Layer dialog appears. Name the layer, e.g., My Base, and click OK. The lock disappears, and you can now edit freely — brushes, filters, transforms, gradients, any tool.

If you want to keep the original untouched, use method two: click the layer to activate it (blue highlight), then press Ctrl + J. A new layer named Layer 1 appears above Background, already unlocked. Work with the copy while the original stays as backup. If something goes wrong, delete the damaged layer and create a fresh copy.

Method three for organization lovers: drag the Background layer onto the Create a New Layer icon at the bottom of the Layers panel (a square with a folded corner). This creates a Background copy that is automatically unlocked. Double-click its name to rename it to something meaningful, like Working Layer or Editable Copy.

Once you master these three basic methods, you'll be able to unlock any layer in seconds. Practice on simple images to build muscle memory. When your fingers know the sequence, work becomes much faster and more enjoyable.

When Not to Unlock a Layer

Sometimes a locked layer is not a problem but a helpful feature. If you're working with a multi-layer template where the designer already arranged everything, don't remove the lock unnecessarily. You might accidentally shift a precisely positioned element.

Lock Transparent Pixels is actively used for buttons, icons, and UI elements. It lets you quickly fill all pixels with a new color without affecting transparent areas or creating selections. If you draw vector elements or work with typography, partial locking is your friend, not your enemy.

Locking also helps with groups. If you've finished composing and don't plan further changes, lock the entire group. This prevents accidental modifications while working on neighboring elements.

Frequently Asked Questions

Why can't I unlock a layer in Photoshop?

Possible reasons: Read-only file attribute, Indexed Color mode (switch to RGB via Image — Mode), or Photoshop is frozen — try restarting. Also check if a blocking tool is active.

How do I unlock all layers at once?

Select all layers with Ctrl (or Shift for range), right-click any selected layer, and choose Unlock All Layers. Different lock types may need individual removal.

What's the difference between Lock All and Lock Position?

Lock All (black padlock) fully blocks the layer. Lock Position (gray padlock with cross) only prevents movement — painting and effects still work.

How do I unlock a background layer without data loss?

Press Ctrl + J to create a copy. The original Background stays untouched while you work on the copy. Delete the original if satisfied, or revert if not.

Can I lock a layer again after unlocking?

Yes, select the layer and click the lock icon at the top of the Layers panel. Use Layer — Lock All Layers in Group from the menu. Photoshop remembers the previous lock type.

Why are all layers locked when opening a PSD?

The file might be saved with edit protection or created in an older Photoshop version. This also happens with PSDs from CorelDRAW, GIMP, or other editors. Check file permissions.

How do I unlock a Smart Object layer?

Double-click the Smart Object icon on the Layers panel — it opens in a separate window. Make changes, save (Ctrl + S), and close. The main layer unlocks automatically.

What if no unlocking method works in Photoshop CC?

Reset preferences: launch Photoshop with Ctrl + Alt + Shift (Windows) or Cmd + Option + Shift (Mac) held down. Confirm the reset. Also check for Photoshop updates.

How to unlock a layer on mobile in Photoshop Express?

Mobile versions of Photoshop Express and Lightroom don't have a traditional Layers panel. Just open the image and tap Edit or Adjust — all tools work immediately.

Does layer locking affect file size or performance?

No, layer locking is just a logical attribute stored in 1 byte of PSD metadata. It doesn't affect file size, loading speed, performance, or image quality in any way.

Tap to react