Getting to Know the Source File: What's Inside the PSD
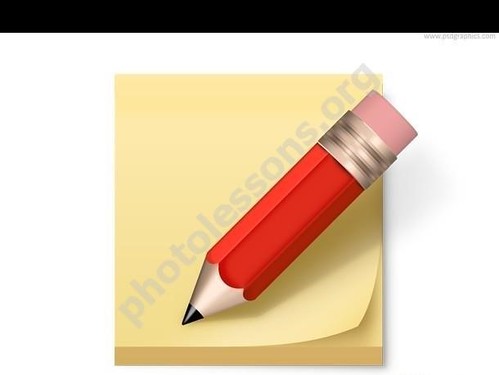
Here is a free Photoshop source file that every designer will find useful — and anyone who needs high-quality office-themed graphics. Inside the modest 2.67 MB archive lies a layered PSD featuring a classic yellow sticky note pinned to a wooden surface. Next to it sits a red pencil and a paper block cube. The scene looks so realistic you'll want to grab that pencil and start writing.
The file resolution is 1280 by 1024 pixels — more than enough for web graphics, presentations, and even small-format printing. Each element of the composition sits on its own layer: the pencil on one, the sticky note on another, the paper block on a third, and the wooden texture background on yet another. You can move, scale, and recolor any object without worrying about affecting neighboring elements.
The red pencil looks as if it was just sharpened. The wood texture of the body, the metal ferrule at the end, the graphite tip — everything is rendered in fine detail. The sticky note has a subtle shadow along the bottom and right edges, creating a sense of depth and separating it from the background. The classic yellow color of the note can be changed with just a couple of clicks in the Layers palette.
\u{201c}The layered structure of this source file is a real gift for beginners. You can study PSD structure on a real-world example: see how shadows are built, how layers are organized, how blending modes are applied.
Technical Specifications
Before diving into editing, let's review the key parameters of the file. Here's a summary table:
| Specification | Value |
|---|---|
| File Format | .PSD (Adobe Photoshop Document) |
| Resolution | 1280 x 1024 pixels |
| Color Mode | RGB, 8 bits per channel |
| Number of Layers | 5+ (pencil, sticky note, paper block, shadows, background) |
| Archive Size | 2.67 MB |
| Compatibility | Adobe Photoshop CS3+, GIMP, Affinity Photo |
| License | Free (personal and commercial use) |
Note: the file is saved in RGB color space with 8-bit depth per channel. This is sufficient for screen graphics. If you need print-quality output, convert to CMYK and increase resolution to 300 dpi via Ctrl+Alt+I in Photoshop.
Step-by-Step Photoshop Editing Guide
After downloading and extracting the archive, open the note-pencil.psd file in Adobe Photoshop. You'll see a workspace with several layers in the Layers panel. Let's go through each editing stage step by step.
Step 1. Replacing the Text on the Sticky Note
The first thing most users want to do is replace the default text with their own. The source file doesn't include a text layer — the inscription is baked into the sticky note layer as raster. No problem: you can overlay your own text on top.
- Select the Horizontal Type Tool (press T on your keyboard)
- Click in the center of the yellow sticky note and type your text
- In the Character panel, adjust the font, size, and color. Handwritten fonts work especially well — they add realism
- Use Ctrl+T to adjust the size and rotation of the text block to match the angle of the sticky note
- Apply a subtle Gaussian Blur (
Filter > Blur > Gaussian Blur, radius 0.3–0.5 px) so the text doesn't look out of place against the raster image
If you want to fully simulate a handwritten note, try fonts like Caveat, Pacifico, or Bad Script from Google Fonts. They're free and do an excellent job of conveying the hand-written effect.
Step 2. Changing the Sticky Note Color
Classic yellow is not your only option. You can turn the sticky note pink, blue, or green in a couple of clicks:
- Locate the sticky note layer in the Layers palette
- Lock transparent pixels by clicking the Lock Transparent Pixels icon at the top of the Layers panel
- Press Shift+F5 to bring up the Fill dialog and choose your desired color. Alternatively, use the Brush tool (B) to paint over the area with any color
- For more precise control, create a Hue/Saturation Adjustment Layer and clip it to the sticky note layer via Clipping Mask (Ctrl+Alt+G)
Step 3. Working with the Pencil
The red pencil is the central element of the composition, drawing the viewer's attention. You can:
- Move it — simply select the pencil layer and drag with the Move tool (V)
- Change its color — similar to the sticky note, via a Hue/Saturation Adjustment Layer with Clipping Mask
- Rotate it — Ctrl+T and rotate by the corner handle of the transform frame
- Replace it with a pen or marker — hide the pencil layer and insert your own image of a writing instrument, adjusting size and position as needed
Tip: if you change the pencil color, don't forget to adjust its shadow color accordingly. A shadow from a red object will differ from the shadow of, say, a blue pencil. Create a separate adjustment layer for the shadow.
Step 4. Adjusting Shadows and Lighting
The shadows in this source file are a particular highlight. They're soft, natural-looking, and create the right sense of depth. If desired, you can fine-tune them:
- Find the shadow layer in the Layers palette. It's typically named "Shadow" and sits below the object layer
- Adjust the Opacity of the shadow layer — this is the quickest way to make shadows more or less pronounced
- Apply Gaussian Blur with different radius values to soften or harden the shadow as needed
- If you moved an object — remember to move its shadow in the corresponding direction
Step 5. Replacing the Background
The wooden background texture looks organic, but sometimes a different backdrop is needed — for instance, a plain white background for a presentation or a desk texture for an office mockup.
The simplest method:
- Open the desired background image in Photoshop
- Drag it into the document with the sticky note, placing it as the bottommost layer
- Adjust size via Ctrl+T
- Hide or delete the original background layer
If the new background is too contrasty relative to the objects, add a Levels or Curves adjustment layer to balance the overall tonality of the scene.
Step 6. Saving the Result
Once all edits are done, save your work via Ctrl+Shift+S. I recommend:
- .PSD — if you plan to return to editing later. Preserves all layers
- .PNG — for web publishing. Supports transparency (if you hid the background)
- .JPG — for inserting into presentations and documents. Saves space but without transparency
Use Cases for the Source File
The sticky note and pencil source file is a versatile tool for dozens of scenarios. Here are just a few ideas:
Office Templates and Documents
A yellow sticky note with handwritten text is a universally recognized symbol of reminders and notes. Insert it into a corporate email template, use it to style an important information block on your website, or make it part of branded letterhead. Clients and colleagues instantly read the visual code: "This is important, pay attention."
UI/UX Interface Mockups
When designing planner apps, note-taking applications, and to-do lists, you often need graphic elements that imitate real-world objects. The sticky note with pencil fits perfectly into the design of a mobile note-taking app, a web-based kanban board interface, or an icon for a "Remind me later" feature.
Stationery Designs and Prints
Planning to print postcards, notebooks, or calendars? Place the sticky note image on a daily planner cover and it instantly comes alive. Add a motivational message on the note, and you have a great design for corporate merchandise.
Blog and Social Media Graphics
Bloggers and SMM specialists are always short on visual content. The sticky note with pencil makes an excellent base for an article announcement, a webinar poster, or a YouTube video thumbnail. Write the headline on the note, add a logo in the corner — and your banner is ready in five minutes.
Presentations and Slides
Boring PowerPoint slides are a thing of the past. Place your key talking points on virtual sticky notes — your audience will appreciate the creative approach. Rotate the notes at different angles to create the effect of scattered reminders on a desk.
Educational Materials
Handbooks, instructions, and guides look much friendlier when key points are highlighted "by hand." Use the sticky note as a container for tips, hints, and "Remember" blocks. Learners absorb information better in this format.
Comparison with Similar PSD Templates
There are other PSD source files with office themes on the market. Let's compare them by key parameters:
| Feature | Note with Pencil | Note on Board | Typical PSD Sticky Note (Freepik) |
|---|---|---|---|
| Resolution | 1280 x 1024 px | 1280 x 1024 px | 800 x 600 px (average) |
| Number of Layers | 5+ (pencil, note, block, shadows, background) | 4+ (note, pins, cork board, shadows) | 1–2 (flattened image or note on transparent background) |
| Extra Elements | Red pencil, paper block cube | Cork board, pushpins | Usually just the note without surroundings |
| Background | Wood texture on separate layer | Cork texture on separate layer | Solid color or merged with the note |
| File Size | 2.67 MB | 4.37 MB | 0.5–2 MB |
| Commercial Use | Yes | Yes | Depends on license (often personal use only) |
As the comparison shows, the Note with Pencil source file stands out from free stock photo alternatives on two parameters: clean layer structure and additional objects. The pencil and paper block make the composition lively and self-contained — you don't need to hunt for them separately.
Frequently Asked Questions
Which versions of Photoshop support this PSD?
The file is compatible with Adobe Photoshop CS3 and all later versions, including Photoshop CC (Creative Cloud). It also opens in free editors: GIMP 2.10+, Krita, Photopea (online). Affinity Photo opens it with minor differences in adjustment layer rendering.
Can I change the pencil color without losing quality?
Yes, and it's very simple. Select the pencil layer, then create a Hue/Saturation adjustment layer (Ctrl+U) and clip it to the pencil layer via Clipping Mask (Ctrl+Alt+G). Move the Hue slider and the pencil will change color in real time. The original layer remains untouched.
How do I add text to the note so it looks realistic?
Use a handwritten font (Caveat, Bad Script, Pacifico), rotate the text slightly to match the note's angle (Ctrl+T + rotation), and apply a barely noticeable Gaussian Blur (radius 0.3–0.5 px). For an ink-like effect, choose a dark blue color instead of pure black — it gives the text a natural look.
Is 1280x1024 resolution sufficient for printing?
For small-format printing (up to 10 cm per side) — yes. For larger prints, increase the resolution: open Image Size (Ctrl+Alt+I), uncheck Resample, and set 300 dpi. Photoshop will automatically recalculate the physical dimensions. If needed, enable Resample with the Preserve Details 2.0 algorithm for scaling without significant quality loss.
Can I use this source file in commercial projects?
Yes. The source file is distributed under a free license that allows both personal and commercial use. You can include the image in paid products: printed materials, website designs, mobile applications, advertising materials. Attribution is not required but is appreciated.
I can't find the shadow layers in the Layers palette — what should I do?
The shadow layers may be grouped or nested inside a folder. Expand the group contents in the Layers palette and ensure all layers are visible (eye icon enabled). Shadows may also be merged with objects through Layer Styles — double-click the layer and look for the Drop Shadow tab.
How do I quickly remove the background and keep only the note and pencil?
Simply hide the background layer (click the eye icon in the Layers palette). If you need an image with a transparent background for use in another project, select the visible object layers, right-click, and choose Quick Export as PNG. Make sure Transparency is enabled in export settings.
Can I open and edit this PSD on a phone or tablet?
Yes. Mobile apps for PSD editing exist: Adobe Photoshop for iPad (requires CC subscription), free Photopea (via browser), and Pixlr. Functionality will be limited compared to the desktop version, but basic operations — text replacement, color changes, layer movement — work fine.
The archive won't open or the file appears corrupted — what now?
Make sure you're using an up-to-date archiver (WinRAR 5+, 7-Zip). Try downloading the archive again — the download may have been interrupted. If the problem persists, check whether your antivirus is blocking extraction. As a last resort, contact the site administration for a corrected version.
Is there a vector version (AI, EPS) of this source file?
No, this source file is only available in the raster PSD format. If you need a vector version, you can manually trace the objects using the Pen Tool (P) and create vector Shape Layers. For the sticky note and pencil, this takes about 15–20 minutes with basic pen tool skills.
Design Tricks: Making the Composition Even More Interesting
The source file is great on its own, but a little tweaking transforms it into a unique project. Here are several professional tricks I use when working with similar PSD files:
Creating Realistic Handwritten Text Effect
Simply typing text with a handwritten font is not enough. For maximum realism, create three copies of your text layer. For each copy, choose a slightly different shade (e.g. dark blue, black, and grayish), reduce opacity to 85-95 percent, and offset each layer by 1-2 pixels in different directions. Merge the layers into a group and apply the Add Noise filter with a 0.5 percent setting to the group. The result: text that looks like it was written with an ink pen on slightly rough paper.
Simulating a Crumpled Note
Want to add some drama? Turn the flat sticky note into a crumpled message. Duplicate the sticky note layer, apply Filter > Distort > Wave with small amplitude settings (2-3 pixels) and frequency (1-2 waves). Then add Filter > Texture > Craquelure for a crease effect. Blend the original and the distorted copy using the Overlay blending mode at 30-40 percent opacity. The paper takes on a characteristic crumpled look without losing its recognizable shape.
Working with Color Palettes
Yellow sticky notes are classic, but consider the context of your project. For a corporate bank website, a subdued blue shade works well. For a kids' app, go with bright pink or orange. For an eco-friendly project, choose muted green. Use Adobe Color or Coolors.co to find harmonious combinations. Change not only the sticky note color but also the pencil shade to keep everything cohesive. A red pencil on a green sticky note is a bold combination that works in creative projects but not in conservative business environments. Think of the sticky note as a color block: it attracts attention, so its color will dominate the perception of the entire composition.
Adding Multiple Notes to the Composition
One sticky note not enough for a presentation or interface mockup? Import the entire PSD as a Smart Object into another document and duplicate it several times. Using Ctrl+T, rotate each instance at its own angle: one 5 degrees to the right, another 3 degrees to the left, a third strictly horizontal. Add different captions to each note. You'll get the effect of a desk strewn with reminders — an excellent background for announcing a productivity workshop or a startup in the productivity software space. The key is not to overdo the rotation angles: notes stuck to a real surface rarely tilt more than 10-15 degrees from horizontal.
Working in Alternative Editors
Not everyone has Photoshop, but that's no reason to skip quality graphics. Let's look at working with the source file in popular free alternatives.
GIMP
The free and open-source GIMP editor version 2.10 and above opens PSD files with support for most layers. After opening the file via File > Open, you will see the familiar layer palette. All blending modes are preserved; adjustment layers may convert to plain raster layers, but this rarely gets in the way. GIMP's toolkit mirrors Photoshop's for basic to intermediate tasks: color replacement via Colors > Hue-Saturation, transformation via Shift+T, text via the A tool.
Photopea
This is an online editor that runs directly in your browser. Go to photopea.com, click File > Open, and select the PSD from your disk. The editor has an interface nearly identical to Photoshop and opens all layers including adjustment layers without loss. The only downside is dependency on internet speed. For one-off edits, it's an ideal solution requiring no software installation. The free version includes all necessary features; a premium subscription removes ads and unlocks additional cloud storage.
Download the Free PSD Source File
The file is available for immediate download — no registration, no SMS, no newsletter subscriptions. Just click the button below:
DownloadAfter downloading, extract the archive with any archiver, open the .PSD file in Photoshop, and start creating. If you find an unconventional use for this source file, share it in the comments — we'd love to see your work.
Tap to react