Sometimes it is useful to adjust individual components and tools in the Adobe Photoshop program. One of them will be discussed in today's lesson.
The Clone Source panel is designed to manage sets of stamps, their parameters such as rotation, width, height, etc.
To open this panel, go to the program menu - Window - Clone Source.
Now let's break down the individual elements of this tool.
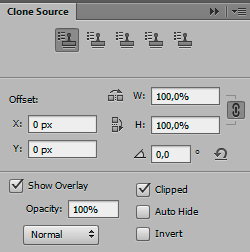
You see 5 identical stamp icons, which means that each of them can have a separate stamp set.
Next is Offset, where you can adjust the offset along the coordinate axes.
There are also parameters for the width and height of the cloning object, angle of inclination.
You can display the overlay of the copy source by checking the Show Overlay option, as well as adjust the opacity, blending modes, etc.
Here are some of the parameters:
- Opacity
- Clipped
- Auto Hide
- Invert
- Blending modes:
- Normal
- Darken
- Lighten
- Difference
If you click the top-right menu of the panel, you can see a list of the following settings:

Here you can find copy sources, reset transformation, show overlay, and some other options.
- Source 1
- Source 2
- Source 3
- Source 4
- Source 5
- Reset Transform
- Show Overlay
- Clip to Brush Tip
- Auto Hide Overlay
- Invert Overlay
- Close
- Close Tab Group
Tap to react


