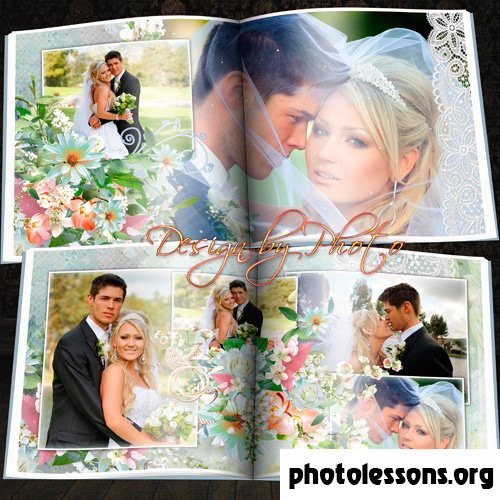
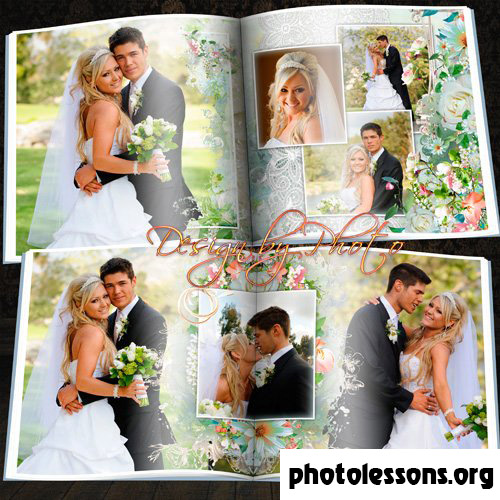
Overview: The Complete Wedding Book + DVD Package

The "We Are Happy" template set solves a problem every wedding photographer encounters: what do you do with the digital files? Couples want a printed album for the coffee table and a digital copy for their TV. This bundle delivers both — ten fully layered PSD files split between the photobook (8 spreads plus cover) and a matching DVD case cover.

The floral design motif runs consistently across all ten files. Soft botanical illustrations frame the photographs without overwhelming them. The color palette leans toward delicate pastels — blush pinks, sage greens, and creamy whites — with enough neutrality to work across different wedding color schemes.

At 1.07 GB, this is the heaviest template in our wedding series. The file size reflects the high-resolution floral illustrations and the additional DVD cover design files. If you have limited disk space or RAM, close other applications before opening these PSDs.

Technical Specifications

ParameterValue
File formatPSD (Adobe Photoshop)
Number of files10 layered source files
Resolution300 dpi
Spread / cover dimensions7205 × 3602 px (book), custom (DVD)
Archive size1.07 GB
Color modeRGB, 8-bit
Design styleFloral, romantic, pastel with botanical accents
DVD cover includedYes — matching design

The Floral Design: Customization Guide

Floral wedding albums walk a fine line between elegant and grandmotherly. The "We Are Happy" design stays on the right side of that line by using flowers as framing elements rather than wallpaper. The botanical illustrations cluster along the edges and corners of each spread, leaving the central image area clean and unobstructed.

Every floral element lives in its own named layer folder. Want to tone down the pink roses to match a blue-themed wedding? Open the "Floral Accents" group, find the rose layer, and adjust its Hue/Saturation. A -40 hue shift turns pink roses lavender. A -120 shift turns them pale blue. The green foliage stays green — those layers are separate and independently adjustable.

The floral density varies across spreads. Cover and title pages have the richest botanical decoration. Interior spreads use lighter floral touches — a single corner cluster, a subtle border trim. This gradient of ornamentation creates a visual rhythm: decorated entrance, clean middle, gently ornamented closing.

To completely change the floral style, replace the smart-object floral illustrations with your own botanical elements. Right-click a floral layer, choose "Replace Contents," and navigate to your alternative illustration. The adjustment layers remain — only the artwork changes.

Color Variations for the Floral Template

Original AccentHue ShiftResultBest Season
Pink roses0 (default)Classic romantic pinkSpring, summer
Pink roses-40Lavender / lilacLate spring
Pink roses-120Pale sky blueSummer, beach weddings
Pink roses+20Peach / coralSummer, tropical
Pink roses+60Deep burgundy redAutumn, winter

Green foliage elements benefit from a matching adjustment. If you shift roses to burgundy, warm the greens slightly (+10 hue, +10 saturation) to maintain a cohesive palette. Cold green foliage next to warm burgundy flowers creates a disjointed look that the eye registers as "something is off" even if you cannot name it.

DVD Cover Design: Complete Guide

The DVD cover is not an afterthought — it is a separate, fully featured design that mirrors the album's floral aesthetic. Here is what the DVD template includes:

  • Front cover — a vertical layout with space for the hero couple photo, wedding date, and names. Floral borders frame the top and bottom edges.
  • Spine — narrow strip with couple names and wedding date in vertical text orientation. Width adjusts to match standard DVD case spines (14 mm).
  • Back cover — space for 2-3 additional photos in a horizontal strip layout, plus a semi-transparent floral watermark background.

When printing the DVD cover, use the same paper stock you selected for the album. A glossy album with a matte DVD cover creates an inconsistent unboxing experience. The cover inserts into any standard single-disc or multi-disc DVD case from Amaray, Scanavo, or similar manufacturers.

Matching DVD Cover with Book Design

Consistency between the printed album and the DVD cover signals attention to detail. Here is how to ensure they feel like part of the same package:

  1. Use the same hero photo. The image on the album cover should also appear on the DVD cover — perhaps cropped differently for the vertical format.
  2. Match the floral accent color. If you shifted the album roses to lavender, shift the DVD cover roses the same amount. Copy the Hue/Saturation values numerically: note the number in the album's adjustment layer, type the same number into the DVD cover's adjustment layer.
  3. Keep fonts identical. The DVD template uses the same typefaces as the album. Do not substitute fonts on one and leave the other unchanged.
  4. Print both on the same paper. Different paper stocks have different white points. Pearl paper on the album and silk paper on the DVD cover will look two different shades even with the same design.
  5. Include the DVD inside the album box. Many album manufacturers offer a slipcase or presentation box with a disc pocket. Placing the matching DVD inside the album packaging completes the experience.
DVD cover dimensions assume a standard 14 mm spine case. If you use a slimline 7 mm case or a multi-disc 25 mm case, adjust the spine width in the PSD before printing. Do not simply stretch the design — it will distort the type and floral elements.

Comparison: Template #3 vs. Templates #1 and #2

Each template in our wedding series targets a different aesthetic. Here is how they compare side by side:

Feature#3: We Are Happy (Floral)#2: Chocolate Tones#1: Two Fates and Two Rings
Design styleRomantic floral, botanicalWarm chocolate, mochaClassic gold, ivory, charcoal
File count10 (8 book + 2 DVD)66
Archive size1.07 GB157 MB502 MB
DVD coverIncludedNot includedNot included
Decorative densityHigh — floral frames, botanical accentsModerate — color blockingRich — gold rings, ribbons
Best forGarden, outdoor, spring weddingsAutumn, winter, warm-lit venuesClassic, formal, all-season
Photo styleLight, airy, pastel editsWarm, golden hour, filmClean, neutral, true-to-color
Learning curveModerate — more layers to manageEasy — focused layer setEasy — well-organized layers

Template #3 is the most feature-complete but also the most demanding. The 1.07 GB archive and ten files mean more customization work upfront. If you need a quick turnaround — templates #1 or #2. If you want the full package including a matching DVD cover and rich floral design — template #3 is the clear winner.

Full Workflow: From Photo Selection to Printed Product

This section walks through the complete production process using template #3. Adapt the timeline to your specific project, but follow the sequence.

Phase 1: Photo Selection (1-2 hours)

Open a cataloging tool like Lightroom or Bridge. Create a collection called "Album Candidates." Go through the full wedding gallery and flag every image that makes you pause. Do not judge — just flag. Then go through the flagged images and unflag anything that is technically flawed (missed focus, blinking subject, poor composition). From the remaining flagged images, select the final set: roughly 30-50 photos for a 10-spread album.

Phase 2: Editing Consistency (1-3 hours)

Batch-edit all selected photos for consistent exposure and white balance. The floral template's pastel background amplifies color casts — a slightly warm photo looks correct, a slightly cool photo looks cold, and a mixed spread looks amateur. Use Lightroom's Reference View (Shift+R) to compare each photo against a master reference image.

Phase 3: Template Customization (2-4 hours)

Open all ten PSD files. Start with the cover — it sets the visual tone. Replace each smart-object photo placeholder. Adjust the floral hue if needed. Once the cover looks right, open each interior spread in sequence and repeat. Save frequently with incremental filenames. Open the DVD cover PSD and apply the same floral adjustments you used on the book cover.

Phase 4: Export and Proof (30 minutes)

Export each spread as an individual page PDF at 300 dpi. For the DVD cover, export as a single PDF at the correct physical dimensions. Send one test spread and the DVD cover to your printer for a proof. Wait for the proof to arrive and evaluate it under the lighting conditions the album will actually be viewed in — warm lamp light for a living room album, not office fluorescents.

Phase 5: Final Export and Order (1 hour)

If the proof looks good, export all remaining pages with identical settings. Package the files according to your lab's submission guidelines. Many labs require: individual page PDFs numbered sequentially, a cover PDF, a spine PDF, and a text file with order details. Double-check every requirement before uploading — a missing spine file delays the order by days.

Photo Selection Tips for Floral Templates

The floral design creates a specific visual environment. Some photos thrive in it. Others look like they wandered into the wrong album.

  • Ideal: Soft, romantic portraits, pastel-toned detail shots, garden ceremony photos, bouquet close-ups, getting-ready shots with natural window light. The floral frames complement images that already have a gentle, romantic quality.
  • Avoid: High-contrast harsh flash photos, urban industrial backgrounds, dramatic black-and-white with heavy grain, neon dance-floor lighting. The soft floral context makes these images feel jarring rather than artistic.

If your wedding gallery contains both soft romantic shots and edgy party candids, consider splitting them. Use the floral template for the romantic ceremony and portrait sections. Export the party candids as a separate mini-album or digital gallery. Forcing edgy photos into a floral frame rarely works.

\u{201c}

The biggest mistake I see with floral templates is photographers trying to cram every photo from the day into one album. A floral design has a mood. Respect that mood. If a photo does not fit — leave it out. The couple will thank you for a coherent album more than an exhaustive one.

Maria Sokolova, Wedding Album Designer, 8 years experience

Printing the Floral Template: Paper and Color Considerations

Floral designs with pastel backgrounds present unique printing challenges. The subtle pink and green tones that look delicate on screen can print flat or disappear entirely on the wrong paper.

  • Lustre — solid all-around choice. Preserves floral detail and pastel tonality without exaggerating contrast. The safe recommendation if you are unsure.
  • Pearl — enhances the romantic feel. The shimmer interacts with floral borders to create a subtle dimensional effect. Pink pastels gain a slight warmth that reads as intentional.
  • Matte — risky for florals. Pastel tones on matte paper lose vibrancy quickly. The delicate green foliage details can turn muddy. Best reserved for fine-art paper with a textured surface that adds character to the muted colors.
  • Silk — excellent tactile experience. Floral designs on silk paper feel like a premium botanical print. Slight contrast loss on pastels is compensated by the physical sensation of the page.

Tips for Professional Results

  1. Adjust floral opacity if the design feels too busy. Some couples love the full floral treatment. Others want it dialed back. The floral layers sit in their own group folder — reduce the entire folder's opacity to 60% for a lighter touch without removing the design entirely.
  2. Keep white space around faces. Do not place the couple's faces directly behind a dense floral element. The flowers are beautiful, but a face half-obscured by digital roses looks like a compositing error.
  3. Test the DVD cover in an actual case. Print a draft on plain paper, trim to size, and insert into a DVD case. Check that the spine text centers correctly and that the front cover photo sits in the expected position behind the case's plastic sleeve.
  4. Archive the working PSDs. A year after the wedding, the couple may request additional prints or a second album copy. Keeping the customized working files saves hours of rework.
  5. Deliver the DVD with a printed disc. A blank white DVD inside a beautiful custom case undercuts the presentation. Print a matching disc label — many inkjet printers support direct disc printing — or order short-run printed discs online.
When exporting the DVD cover, use Photoshop's "Save As" → "Photoshop PDF" and select the "High Quality Print" preset. The resulting file includes trim marks that guide the print shop's cutting. Without trim marks, the cover may be cut incorrectly, misaligning the spine text.

Frequently Asked Questions

What if the floral design does not match my wedding colors?

Every floral element is adjustable via Hue/Saturation layers. Shift pink roses to any color that matches the wedding palette. The adjustment is non-destructive — you can revert to the original with one click. The template includes a "Reset to Original" adjustment layer preset in the Color Grading folder.

Do I need 1.07 GB of free space on every computer that opens these files?

The 1.07 GB is the compressed archive size. Extracted, the ten PSD files require approximately 1.3-1.5 GB of disk space. Additionally, Photoshop needs scratch disk space equal to roughly 2-3 times the file size for temporary operations. Budget 5 GB of free space for a smooth editing experience.

Can I print the DVD cover at home?

Yes, with a photo printer that handles A4 or letter-sized paper. The DVD cover template is sized for standard 184 mm × 273 mm case inserts — which fit on A4 paper with trim margins. For best results, use photo paper with a weight of 170-200 gsm. Standard 80 gsm office paper will look thin and unprofessional inside a DVD case.

How do I add more DVD covers for additional discs?

The template includes one DVD cover. To create a second cover for a multi-disc set, duplicate the DVD cover PSD and change the photo selection. Keep the floral design and fonts identical. The spine text should indicate "Disc 1" and "Disc 2" or similar labelling.

Can I use the floral elements separately for other projects?

The floral illustrations are smart objects embedded in the PSD. You can copy them to any other Photoshop document. Open both the template and your target document. Drag the "Floral Accents" group from the template layers panel into the target document's canvas. The smart object integrity is preserved.

What if Photoshop runs out of memory with the 1.07 GB archive?

Open files one at a time rather than all ten simultaneously. Go to Edit → Preferences → Scratch Disks and add a second drive with free space if available. Reduce the number of history states from the default 50 to 20. If RAM is below 8 GB, consider upgrading — the 1.07 GB file set is designed for computers meeting current Photoshop system requirements.

Does the DVD cover template include bleed?

Yes. The DVD cover PSD includes 3 mm bleed on all sides. The trim guides are on a separate locked layer at the top of the stack. Keep the guides visible during editing and hide them before the final export to PDF.

What video formats should I put on the wedding DVD?

Standard DVD-Video format (MPEG-2) plays on any DVD player. Most couples will also appreciate a folder with high-resolution MP4 files for computer playback. If you deliver both, label the disc clearly: "DVD-Video + Digital Files" to avoid confusion when the couple inserts it into a player and sees a file browser instead of a menu.

Can this template be used for a non-wedding floral album?

Absolutely. The floral design suits maternity shoots, newborn portraits, garden party events, and botanical-themed family sessions. The absence of wedding-specific text or ring graphics makes it versatile — only the default text layers reference wedding dates.

Full Print Guide (Book + DVD)1.6 MB

Tap to react