Today’s lesson is dedicated to installing the Joomla CMS system on a hosting service with subsequent setup. We’ll learn how to quickly and easily install this CMS on your website in just a few minutes.

First of all, you’ll need the distribution package for this system. Go to this link and download version 2.5 to your computer, or whichever version you prefer (at this time, version 2.5 is the most stable).
Before uploading Joomla! to the server, make sure your server or hosting service meets the minimum requirements:
PHP 4.2.x or higher
MySQL 3.23.x or higher
Apache 1.13.19 or higher
PHP must support MySQL, XML, and Zlib.
Thus, we need to check whether the database has been created and whether the server settings match our defaults. If not, contact your provider’s technical support to clarify all necessary requirements.
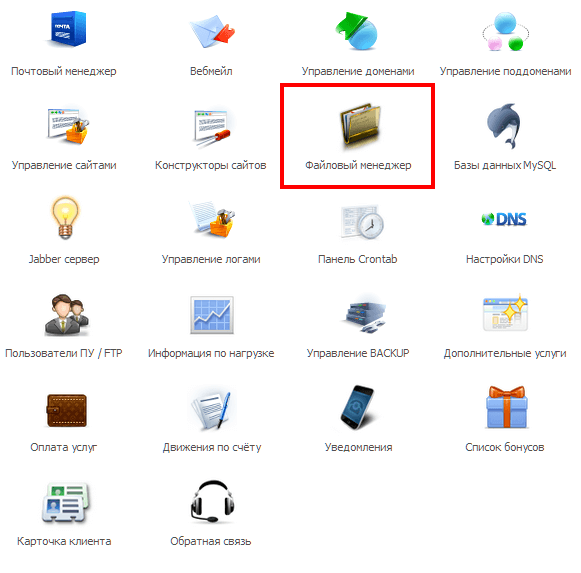
Next, go to your provider’s server settings where your website files are located and look for the File Manager option. All you need to do is upload the newly created file to the website’s root directory.
Note: settings, as well as the hosting control panel, vary by provider, so I’ll only cover the settings for my hosting service.
I recommend using the following hosting service, which has been tried and tested over time, in case you don’t currently have a hosting provider.

Click the button to access the main page, where you’ll see a list of your websites. If necessary, you can import them from another provider.
You’ll need the public_html directory. Open it.

This is where the Joomla distribution file should be located.
Once it’s uploaded, you need to extract it within the directory.

Now you can safely enter your domain name in the browser’s address bar, provided you’ve already registered it...
The installer will launch, allowing you to easily and quickly set up the Joomla CMS system.
All you need to know during installation is your database name, server details, database access password, and so on.
In any case, your hosting provider’s technical support will respond quickly and assist with configuring specific server components.
Don’t forget to save all the entered data, as you may need it later for reinstallation or Joomla configuration, such as FTP access.

At the end of the installation, don’t forget to delete the installation folder from the website’s root directory!
That’s it—Joomla CMS installation is complete, and you can now move on to the admin panel to configure the system.

Tap to react