Всем давно известно, что технологии 3D тесно взаимосвязаны практически с любым приложением или программой. Именно по этой причине многие производители софта, как например, Adobe Photoshop стремятся внедрить данный инструмент в свои решения по разработке и редактированию. Сегодня мы рассмотрим один из самых сложных, но в то же время удобных инструментов - панель 3D в программе Фотошоп.

В Photoshop 3D объекты редактируются подобно Smart ObjectsСмарт объекты. Каждый из таких слоев в 3D модели имеет свои собственные сцены и свойства, которые могут быть созданы при помощи 5 разных способов, к ним относятся: создание из файла, из слоя, из плоскости (открытка), базового объекта, градиента или комбинации из 2 слоев.
Давайте более подробно рассмотрим данную панель.
Итак, чтобы воспользоваться ею, вам необходимо установить Adobe Photoshop расширенную версию, так как в других версиях она недоступна.
Находим контекстное меню на панели, или проходим в меню программы Window - 3DОкно - 3D.
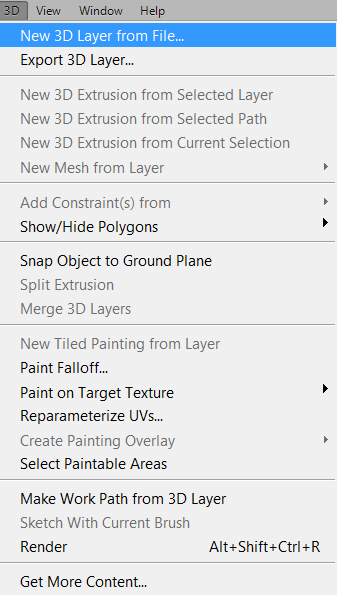
В данном меню можно выделить несколько значений, а именно:
- New 3D Layer from FileНовый 3D слой из файла
- Export 3D LayerЭкспорт 3D слоя
- New 3D Extrusion from Selected LayerНовая 3D экструзия из выбранного слоя
- New 3D Extrusion from Selected PathНовая 3D экструзия из выбранного пути
- New 3D Extrusion from Current SelectionНовая 3D экструзия из текущего выделения
- New Mesh from LayerНовая сетка из слоя
- Add Constraint(s) fromДобавить ограничение(я) из
- Show/Hide PolygonsПоказать/Скрыть многоугольники
- Snap Object to Ground PlaneПривязать объект к плоскости объекта
- Split ExtrusionРазделение экструзии
- Merge 3D LayersСоединить 3D слои
- New Tiled Painting from LayerНовая мозаичная картина из слоя
- Paint FalloffУгловое выцветание
- Paint on Target TextureРаскрасить на основе текстуры
- Reparameterize UVsПовторная параметризация UV
- Create Painting OverlayСоздание наложения окраски
- Select Paintable AreasВыбор окрашиваемых областей
- Make Work Path from 3D LayerСоздать рабочий путь из 3D слоя
- Sketch With Current BrushНабросок с текущей кистью
- RenderОбработка
- Get More ContentПолучить больше контента
В верхней части панели 3D можно найти следующие компоненты, с помощью которых можно управлять содержимым.
![]()
- Rotate the 3D ObjectПовернуть 3D объект
- Roll the 3D ObjectВращать 3D объект
- Drag the 3D ObjectТянуть 3D объект
- Slide the 3D ObjectВыдвинуть 3D объект
- Scale the 3D ObjectМасштабировать 3D объект
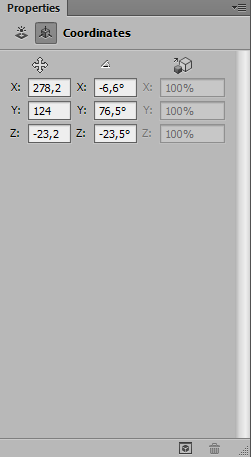
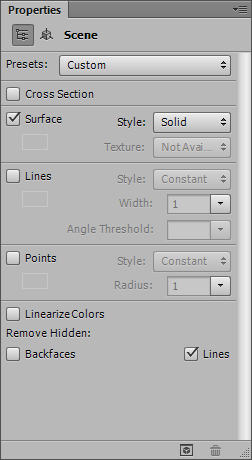
Кроме того, каждый 3D объект имеет свои свойства для каждого из элементов - это координаты объекта, его цвет, глубина и т.д.


Более подробно о каждом свойстве 3D панели будет рассказано в следующих статьях...
Tap to react


