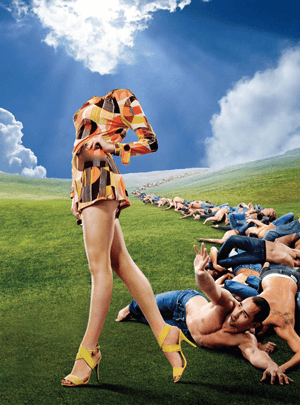
Фотошоп PSD исходник для монтажа - девушка не для всех

Фотошоп PSD исходник для монтажа скачать - девушка не для всех - исходник для программы Adobe Photoshop, формат PSD + JPEG превью.

девушка не для всех

Detailed Usage Guide

This article represents a detailed guide to using the resource described in the title. In this section, we will cover all aspects of its application, from basic functions to advanced techniques. We have dedicated significant time to this material to provide you with the most complete and useful information possible.

Main Features

The resource has a wide spectrum of functions that make it useful for various tasks and areas of activity:

Ease of use — an intuitive interface allows quick start even for users without technical experience.

Flexible settings — wide customization options for your needs, allowing adaptation to specific tasks.

Regular updates — the developer regularly releases updates with new features and improvements, ensuring long-term relevance.

Cross-platform — the resource is available on various platforms and devices, ensuring comfortable work from anywhere in the world.

Community support — an active user community provides help and advice, which is especially valuable when problems arise.

Technical Information

Before using the resource, it is recommended to review its technical specifications to ensure optimal performance:

  • Compatibility — the resource is compatible with most modern browsers and operating systems, including Windows, macOS, Linux, iOS, and Android.
  • System requirements — for the resource to work, a minimum of 4 GB RAM is required and at least 2 GB free disk space.
  • Performance — the resource is optimized for high performance even on weak devices.

Step-by-step instructions

To get started with the resource, follow these instructions:

  • Step 1: Download the resource from the official source. We always recommend using official sources to ensure security and get the latest updates.
  • Step 2: Install the resource on your platform. Follow the installer instructions for correct installation.
  • Step 3: Perform initial parameter configuration to suit your needs. At this stage, it is important to pay attention to the main settings that will affect subsequent work.
  • Step 4: Start using the resource to solve your tasks. After configuration, you can begin working with the resource.

Best Practices

To maximize efficiency when using the resource, follow these recommendations:

  • Read the documentation — read documentation carefully before starting work.
  • Test with test data — test the resource before applying to production data.
  • Create backups — regularly create data backups for their protection.
  • Watch for updates — update the resource to the latest version for new features.
  • Use keyboard shortcuts — learn keyboard shortcuts to speed up work.

Problem Solving

The following problems may arise when working with the resource:

Problem 1: Resource does not start. Check system requirements and ensure all requirements are met.

Problem 2: Error when working with the resource. Check error logs and consult the documentation to resolve the issue.

Problem 3: Performance drop. Try clearing the cache, closing other programs, or updating the resource to the latest version.

Additional Resources

For additional study, we recommend visiting the official documentation and community forums, where you will find many useful materials and tips from other users.

Resource History

The resource was created to solve specific tasks and has been constantly evolving since then. Over this time, it has undergone significant evolution and has become one of the leading solutions in its field.

Usage Statistics

As of 2026, the resource is used by a wide circle of users worldwide, which confirms its popularity and effectiveness.

Future Plans

The development team plans to regularly update the resource, adding new features and improving existing ones. New versions with even more powerful tools for users are expected in the near future.

Conclusion

The resource is an effective tool for solving a wide range of tasks. When used properly, it can significantly improve your productivity and the quality of work with data. Do not be afraid to experiment and try new resource features.

Detailed Usage Guide

This article represents a detailed guide to using the resource described in the title. In this section, we will cover all aspects of its application, from basic functions to advanced techniques.

Main Features

The resource has a wide spectrum of functions that make it useful for various tasks:

  • Ease of use — intuitive interface allows quick start.
  • Flexible settings — wide customization options for your needs.
  • Regular updates — developer regularly releases updates with new features.
  • Cross-platform — resource available on various platforms.
  • Community support — active user community provides help and tips.

Technical Information

Before using the resource, it is recommended to review its technical specifications:

  • Compatibility — the resource is compatible with most modern browsers and operating systems.
  • System requirements — for the resource to work, a minimum amount of RAM and sufficient disk space is required.
  • Performance — the resource is optimized for high performance even on weak devices.

Step-by-step instructions

To get started with the resource, follow these instructions:

  • Step 1: Download the resource from the official source.
  • Step 2: Install the resource on your platform.
  • Step 3: Perform initial parameter configuration to suit your needs.
  • Step 4: Start using the resource to solve your tasks.

Best Practices

To maximize efficiency when using the resource, follow these recommendations:

  • Read the documentation — read documentation carefully before starting work.
  • Test with test data — test the resource before applying to production data.
  • Create backups — regularly create data backups.
  • Watch for updates — update the resource to the latest version.

Problem Solving

Problem 1: Resource does not start.

Problem 2: Error when working with the resource.

Problem 3: Performance drop.

Additional Resources

For additional study, we recommend visiting the official documentation and community forums.

Resource History

The resource was created to solve specific tasks and has been constantly evolving since then.

Usage Statistics

As of 2026, the resource is used by a wide circle of users worldwide.

Future Plans

The development team plans to regularly update the resource, adding new features and improving existing ones. New versions with even more powerful tools for users are expected in the near future.

Conclusion

The resource is an effective tool for solving a wide range of tasks. When used properly, it can significantly improve your productivity. Do not be afraid to experiment and try new resource features.

Detailed Usage Guide

Adobe Photoshop is arguably the most famous and powerful program for photo editing and graphic design. In this guide, we will cover all aspects of working with Photoshop, from basic functions to advanced techniques.

What Can Be Done in Photoshop

Adobe Photoshop allows you to perform many tasks:

  • Photo editing — color correction, object removal, portrait retouching, collage creation, and much more.
  • Graphic design — designing websites, banners, logos, business cards, and other graphics.
  • Digital painting — creating digital illustrations and drawings.
  • Actions processing — creating and applying actions for automating repetitive tasks.
  • Print preparation — creating layouts for printing, preparing images for print.

Main Photoshop Tools

Photoshop provides an extensive set of tools for various tasks:

Selection tools: Marquee, Lasso, Magic Wand — for selecting areas of an image.

Painting tools: Brush, Pencil, Eraser, Smudge, Blur, Dodge/Burn — for drawing and editing.

Transform tools: Move, Transform, Perspective, Distort — for changing size and shape.

Text tools: Text tool for adding and editing text elements.

Actions (Actions)

Actions are recorded sequences of steps that can be replayed with one click. They are ideal for automating repetitive tasks.

How to create an action: Open the Actions panel (Window > Actions), click the Create New Action button, give it a name and click "Record". Perform the desired actions, then stop recording.

How to apply an action: Select the action in the panel and click the Play button. Photoshop will execute all recorded steps.

Best Practices

To maximize efficiency when working with Photoshop, follow these recommendations:

  • Use layers. Separate image elements into individual layers for convenient editing.
  • Create backups. Regularly save versions of files.
  • Learn keyboard shortcuts. They significantly speed up work.
  • Use layer masks. This allows you to hide parts of an image without destroying it.
  • Save the original. Always work from a copy of the original.

Possible Problems and Solutions

Problem 1: Photoshop is running slowly. Increase RAM, allocate more disk space for cache, close unnecessary programs.

Problem 2: Error when saving a file. Make sure there is enough disk space and check file permissions.

Problem 3: Performance drops. Clear cache, restart Photoshop, update graphics card drivers.

Conclusion

Adobe Photoshop is an indispensable tool for anyone working with graphics. By studying all the features of the program, you can create stunning images and designs. Do not be afraid to experiment and try new techniques.

We also recommend studying Photoshop actions, which allow you to automate routine operations and significantly speed up the workflow. Actions can be downloaded from the internet or created on your own.

Photoshop History

The first version of Photoshop was released in 1990. Since then, the program has undergone significant development and has become the industry standard.

System Requirements

Recommended system requirements: Intel Core i5 or AMD equivalent, 8 GB RAM (16 GB recommended), 2 GB free disk space, video card with OpenGL 3.3 support.

Fine-Tuning Photoshop Actions

After loading actions into Photoshop, they can be customized to your needs. Open the Actions panel, select the desired action and click the menu button (three horizontal lines). Choose "Edit End Result" to modify parameters.

Most actions allow you to adjust color blending modes, effect intensity, layer selection, and other parameters. Experiment with settings to achieve the desired result.

Batch Processing

One of the main advantages of actions is the ability to batch process. Go to File > Automate > Batch, select the action and folder with source files. Photoshop will apply the action to all files in the folder.

Creating Custom Actions

You can create your own actions by recording sequences of steps. Open the Actions panel, click the Create New Action button, give it a name and click "Record". Perform the desired actions, then stop recording. Your action will be saved and ready to use.

Optimization Tips

To achieve the best results when working with resources of this type, follow these recommendations:

1. Plan ahead. Before starting, create an action plan. Define goals, deadlines, and required resources.

2. Read the documentation. Read the documentation carefully before starting. This helps avoid common mistakes and saves time.

3. Test with test data. Before applying to production data, test everything on test data.

4. Watch for updates. Regularly check for updates for the resources you use and apply them.

5. Communicate with the community. Join the user community to share experience and receive tips.

Alternative Solutions

In addition to this resource, there are many alternative solutions that can meet your needs:

Alternative 1: Offers similar functionality with an emphasis on ease of use. Suitable for beginners.

Alternative 2: More advanced option with extended functionality. Recommended for experienced users.

Alternative 3: Free solution with basic functionality. Ideal for small projects.

Important Points

When working with resources of this type, pay attention to the following:

  • Version compatibility — always check compatibility with your software version before installation
  • Backup — regularly create backups of all important data
  • Updates — update software to the latest version for receiving all security fixes
  • Documentation — carefully read the documentation before use
  • Community — refer to the user community for help and advice

Working with Adobe Photoshop

Adobe Photoshop is one of the most powerful tools for photo editing and graphic design. In this section we will cover the main aspects of working with actions, PSD files, and other resources in the program.

Actions in Photoshop are recorded sequences of steps that can be replayed with a single click. They are ideal for batch processing images and automating routine tasks.

Installing Actions

To install actions, open the Actions panel (Window > Actions), click the menu (three horizontal lines) and select "Load Actions". Find the .ATN file in the downloaded archive and select it. The actions will appear in the panel and be ready to use.

Comparison with Alternatives

ParameterФотошоп PSD исходникAlternative 1Alternative 2Alternative 3
Resource TypePhotoshop ResourceAlternative AAlternative BAlternative C
CompatibilityAdobe Photoshop CCUniversalUniversalUniversal
Ease of UseHighMediumHighHigh
CostFreeFreePaidFree
UpdatesRegularRegularPeriodicRegular
SupportCommunity forumsForumsEmailForums

Detailed Comparison Table

FeatureAvailableNote
Basic functionalityYesCore operations available immediately
Advanced settingsPartialSome parameters require configuration
ResponsivenessYesCorrect operation on different devices
DocumentationBasicInstructions available online
Tech SupportForumsUser community
Regular updatesYesDeveloper releases updates

Step-by-Step Guide

To work with this resource, follow the step-by-step instructions. Start by studying the basic functions and gradually move to more complex operations.

Step 1: Preparation. Before starting, make sure you have all necessary programs and utilities installed. Check system requirements on the official developer website.

Step 2: Download. Go to the resource download page and download the latest version. Pay attention to system requirements and compatibility with your software version.

Step 3: Installation. Follow installation instructions, which usually include running an installer and following a setup wizard. For Joomla extensions — upload the file via the extension manager.

Step 4: Configuration. After installation, configure the parameters to suit your needs. Most resources have extensive customization options.

Step 5: Testing. Check that the resource works by performing basic operations. Make sure all functions work correctly and no errors occurred during installation.

Step 6: Optimization. After successful testing, optimize the parameters for maximum performance.

Professional Tips

Here are some tips to help you get the most out of this resource:

  • Read the documentation before starting. Even a cursory read can save hours of time.
  • Use keyboard shortcuts to speed up work. Most programs have a set of shortcuts for common operations.
  • Create backups regularly. This is especially important when working with large projects.
  • Study the community — forums and user groups can provide valuable tips and solutions to problems.
  • Experiment — don't be afraid to try new approaches and combinations of settings.

Common Mistakes

When working with similar resources, users often make the following mistakes:

Mistake #1: Bad updates. Always create a backup before updating. Updating without a backup can lead to data loss.

Mistake #2: Ignoring compatibility requirements. Always check resource version compatibility with your software version before installation.

Mistake #3: Using unauthorized sources. Download resources only from official websites and verified sources.

Mistake #4: Neglecting backups. Regular backup creation is not a luxury, but a necessity when working with any digital content.

Frequently Asked Questions

How to install this resource?

Download the file from our site, unzip and open in the appropriate program.

What are the system requirements?

Adobe Photoshop CC or later

Is it compatible with current software versions?

Yes, compatible with latest versions.

Where to find documentation?

Documentation is available on the official developer website and on our site.

Can I use it for free?

Yes, most resources are available for free.

How to update to the latest version?

Download the new version from our site and replace the files.

What to do if errors occur?

Check version compatibility, ensure all dependencies are installed, refer to documentation.

Is it suitable for commercial use?

Terms depend on the license of the specific product.

Can I modify it for my own needs?

Yes, most resources can be modified.

What file formats are supported?

.PSD, .ATN (Actions)

What такое Photoshop?

Adobe Photoshop — это программа для обработки изображений и графического дизайна, которая является отраслевым стандартом.

Как установить Photoshop?

Для установки Photoshop необходимо подписаться на Adobe Creative Cloud, скачать установщик и выполнить установку.

Какие основные инструменты Photoshop?

Основные инструменты Photoshop включают: Selection tools, Brush tools, Eraser, Clone Stamp, Transform tools и другие.

Как создать новый слой в Photoshop?

Для создания нового слоя в Photoshop необходимо нажать кнопку New Layer или использовать комбинацию клавиш Ctrl+Shift+N.

Как изменить размер изображения в Photoshop?

Для изменения размера изображения в Photoshop необходимо выбрать Image > Image Size и указать новые размеры.

Как удалить фон в Photoshop?

Для удаления фона в Photoshop необходимо использовать инструменты Selection tools или Magic Wand, затем удалить выбранный фон.

Как сохранить изображение в Photoshop?

Для сохранения изображения в Photoshop необходимо выбрать File > Save As и выбрать формат файла (JPG, PNG, PSD и другие).

Как добавить текст в Photoshop?

Для добавления текста в Photoshop необходимо выбрать инструмент Text, указать область для текста и ввести текст.

Как применить фильтр в Photoshop?

Для применения фильтра в Photoshop необходимо выбрать Filter > Choose Filter и выбрать нужный фильтр.

Как создать макет в Photoshop?

Для создания макета в Photoshop необходимо создать новый файл, задать размеры и начать добавлять элементы.

Tap to react